• Brain atlas sensitivity
  • Tibia bone with structure illumination
  • Photon trajectories
  • Digimouse photon simulations
  • BlenderPhotonics Colin27 project
  • Simulation of large vessel networks
  • Head-neck sensitivity

MCX logoMCX

Monte Carlo eXtreme

Physically accurate and validated GPU ray-tracer

Run in Cloudβ or Download v2024.2 or Nightly-build

2024.04.09Register today for in-person MCX/NeuroJSON training workshop (Jun 23-26)
03.15MCX Suite v2024.2 is here, download it today
03.02NeuroJSON is seeking biophotonics/fNIRS researchers' feedback!
02.26Update MCX/MCXCL to fix a severe bug for pattern source
02.18MCX Cloud adds new backup servers and 3D rendering features
2023.12.31MCX now supports simulating multiple sources
10.01MCX suite v2023 is announced, download it today!
05.11New paper on RF replay, neonatal brain atlas and more
04.28An interactive tutorial for MCXLAB
03.22Running pmcx simulations on Google Colab, read more ...
03.11MMC and MCXCL migrate to Github Action, get latest Github builds
01.19Announcing Python-binding of MCX, pmcx, officially on pypi

Go to Documentation
  • Brain atlas sensitivity
  • Tibia bone with structure illumination
  • Digimouse photon simulations
  • Head-neck sensitivity

MCX logoMMC

Mesh-based Monte Carlo

Anatomically accurate 3D Monte Carlo simulator

Download v2024.2 or Nightly-build

2024.03.15MCX Suite v2024.2 is here, download it today
2023.10.01MCX suite v2023 is announced, download it today!
2022.04.15BlenderPhotonics is announced, read full paper
2020.03.03MMC and MMCLAB are officially in Fedora
2019.11.20GPU MMC paper is published on JBO
07.12GPU MMC is announced
04.29New Release:MCX/MMC/MCXCL 2019.4
02.20Next-gen MMC - DMMC - is published on JBO
2018.08.20MCX/MMC 2018 (1.0 final) is here!

Go to Documentation
guide

Get Started

MCX is a GPU-accelerated, general-purpose, rigirously-validated and feature-rich 3-D light transport simulator. It is one of the fastest simulators because it can use tens of thousands of GPU threads to simulate photons in parallel.

The core features of MCX include

  • - supporting arbitrarily complex 3-D volume using a voxelated domain
  • - supporting GPU acceleration using a single or multiple GPUs
  • - cross-platform graphical user interface - MCXStudio
  • - native MATLAB/GNU Octave integration with MCXLAB
  • - supporting various boundary conditions
  • - time-resolved photon transport simulations
  • - calculating diffuse reflectance
  • - recording rich set of detected photon information
  • - supporting over a dozen source forms, including wide-field and pattern illuminations
  • - user adjustable voxel resolution
  • - flexible JSON interface for future extensions
  • - supporting continuously varying media

Above all, MCX is open-source and free for everyone. Give it a try!

Please check out MCX Wiki to find video tutorials and detailed documentations.

Preparation: JSON input
If one uses MCX in the command line mode, it is highly recommended to use the JSON-format input file 
to define the simulations. JSON is a text-based data format derived from Javascript. It is human-readable
and easy to extend. In MCX's JSON input files, the input information is self-explanatory
{ "Domain": { "VolumeFile": "semi60x60x60.bin", "Dim": [60,60,60], "Media": [ {"mua": 0.00, "mus": 0.0, "g": 1.00, "n": 1.0}, {"mua": 0.005,"mus": 1.0, "g": 0.01, "n": 1.0} ] }, "Session": { "Photons": 1000000, "RNGSeed": 29012392, "ID": "qtest" }, "Forward": { "T0": 0.0e+00, "T1": 5.0e-09, "Dt": 5.0e-09 }, "Optode": { "Source": { "Pos": [29.0, 29.0, 0.0], "Dir": [0.0, 0.0, 1.0], "Type": "pencil", "Param1": [0.0, 0.0, 0.0, 0.0], "Param2": [0.0, 0.0, 0.0, 0.0] }, "Detector": [ { "Pos": [29.0, 19.0, 0.0], "R": 1.0 } ] } }
Preparation: Define the volume
The volume file is a binary file, representing the tissue information of
a 3D volume. Each byte of the file is a label of a voxel - the label value
(0-255) is the index of the voxel's tissue type.

The volume file is specified in the JSON input file by the "VolumeFile" tag in
the "Domain" section. If one uses the legacy input file, the volume file is
specified in the 4th line.

Preparation: Legacy input file
Historically, MCX supports an extended 
version of the input file format (.inp) used by tMCimg. However, we are phasing out 
the .inp support and strongly encourage users to adopt JSON formatted (.json) input 
files. Many of the advanced MCX options are only supported in the JSON input format.

The legacy input file looks like below

1000000              # total photon, use -n to overwrite in the command line
29012392             # RNG seed, negative to generate
30.0 30.0 0.0 1      # source position (in grid unit), the last num (optional) sets srcfrom0 (-z)
0 0 1 0              # initial directional vector vx,vy,vz, last number is the focal length, nan for isotropic launch
0.e+00 1.e-09 1.e-10 # time-gates(s): start, end, step
semi60x60x60.bin     # volume ('unsigned char' format)
1 60 1 60            # x voxel size in mm (isotropic only), dim, start/end indices
1 60 1 60            # y voxel size, must be same as x, dim, start/end indices
1                    # num of media
1.010101 0.01 0.005 1.37  # scat. mus (1/mm), g, mua (1/mm), n
4       1.0          # detector number and default radius (in grid unit)
30.0  20.0  0.0  2.0 # detector 1 position (real numbers in grid unit) and individual radius (optional)
30.0  40.0  0.0      # ..., if individual radius is ignored, MCX will use the default radius
20.0  30.0  0.0      #
40.0  30.0  0.0      #
pencil               # source type (optional)
0 0 0 0              # parameters (4 floats) for the selected source
0 0 0 0              # additional source parameters

Output: Fluence output
MCX outputs the 3D flux distribution by default (unless "-S 0" is used). Alternatively, if a user specifies "-O F", the output volume is the fluence; if "-O E" is used, the output volume is the energy deposit; if "-O J" or "-O T" is used, the output is the absorption sensitivity profile, i.e. the Jacobian of mua.

The volumetric output file has a suffix of "".mc2", and is a binary file with a size of (Nx x Ny x Nz x Nt x 4) bytes, where Nx/Ny/Nz are the dimensions of the input volume in the x/y/z direction, respectively, Nt is the total number of time gates, calculated by ceil(tend-tstart)/tstep), and the number 4 represents the byte length of a single-precision floating-point number. The first (Nx x Ny x Nz) floating point numbers (4-byte each) are the accummulated fluence distribution, in the unit of (1/(s*mm^2)), for the first time gate (averaged at the middle of the time gate); then the second gate, and so on.

By default, MCX's flux/fluence output is normalized to produce a time-domain Green's function, or time-domain point-spread function (TPSF) - i.e. the solution for an impulse input of unitary energy at t=0. One can disable the normalization by using "-U 0".

The mc2 file can be loaded into matlab using the loadmc2() function, provided under the mcx/utils folder. Please run help loadmc2 for details.

To convert the flux output to fluence, one simply multiply the solution by the time gate width, tstep, defined in the input file. Similarly, dividing tstep from the fluence solution produces the flux.

Output: Detected photon info
By default, MCX saves the information of the detected photons. One can also enable this feature by appending "-d 1" in the command line. The output file with the detected photon info is named as "session_name.mch".

The mch file can be loaded into matlab using the loadmch() function, provided under the mcx/utils folder. Please run help loadmch for details.

The mch file is a binary file containing the following 3 blocks: a 256-byte header, followed by a block of floating-point numbers for the partial path lengths, then followed by a block of byte arrays recording the random number generator (RNG) seed data for each detected photon (20 byte per photon). An mch file may contain multiple repetitions of the above 3-block data chunks.

The header contains the following information

typedef struct MCXHistoryHeader{
	char magic[4];                 /** magic bits= 'M','C','X','H' */
	unsigned int  version;         /** version of the mch file format */
	unsigned int  maxmedia;        /** number of media in the simulation */
	unsigned int  detnum;          /** number of detectors in the simulation */
	unsigned int  colcount;        /** how many output files per detected photon */
	unsigned int  totalphoton;     /** how many total photon simulated */
	unsigned int  detected;        /** how many photons are detected (not necessarily all saved) */
	unsigned int  savedphoton;     /** how many detected photons are saved in this file */
	float unitinmm;                /** what is the voxel size of the simulation */
	unsigned int  seedbyte;        /** how many bytes per RNG seed */
        float normalizer;              /** what is the normalization factor */
	int respin;                    /** if positive, repeat count so total photon=totalphoton*respin; if negative, total number is processed in respin subset */
	unsigned int  srcnum;          /** number of sources for simultaneous pattern sources */
	unsigned int  savedetflag;     /** detected photon output specifier */
	int reserved[2];               /** reserved fields for future extension */
};

Following the header, a total of savedphoton*colcount words (32bit) records represent the detected photon info, each photon occupies "colcount" words saved in the order of being detected. A typical detected photon record consists of the following:

  DetID, ScatNum, PP1, PP2, ..., PPN

where DetID is an integer, indicating the index of the detector that captures the photon; ScatNum records the total number of scattering events before the photon is captured; PP1 - PPN are floating point numbers, denoting the partial path lengths for media time 1 to N.

Output: Command line output
MCX outputs a text log on the command line window (stdout). In this log,
one can find the thread/block configuration, timing of each section of the simulation,
the detected photon info, and normalization information.

When -p/--printlen is used in the command line, mcx also prints the final state
of the last photon simulated by each thread. This information can be used to
debug mcx.

When compiling mcx with "make debug", mcx can print step by step debug info
of each simulated photon.
Options

JSON InputShortLong commandMATLAB/OctaveValueMeaningMCX,MCXLAB,MCXCL,MCXLABCL,MMC,MMCLAB,MMCL,MMCLABCL
Optical Parameters Domain.VolumeFilecfg.vol2D or 3D arrayDomain volumeYYYY
Mesh.IDcfg.{node,elem}mesh dataDomain meshYYYY
Mesh.InitElemcfg.e0integerInitial element index (>0)YYYY
Domain.Mediacfg.prop(media count+1)x4 arrayOptical propertiesYYYYYYYY
Forward.T0cfg.tstartfloatStart time in secondYYYYYYYY
Forward.T1cfg.tendfloatEnd time in secondYYYYYYYY
Forward.Dtcfg.tstepfloatTime gate width in secondYYYYYYYY
Optode.Source.Typecfg.srctypestring ('pencil')Source typeYYYYYYYY
Optode.Source.Poscfg.srcpos1x4 floatSource position in grid unitYYYYYYYY
Optode.Source.Dircfg.srcdir1x4 floatSource direction (vx,vy,vz) and focal lengthYYYYYYYY
Optode.Source.Param1cfg.srcparam11x4 floatSource parameters set 1YYYYYYYY
Optode.Source.Param2cfg.srcparam21x4 floatSource parameters set 2YYYYYYYY
Optode.Source.Patterncfg.srcpattern2D or 3D arraySource pattern dataYYYYYYYY
Optode.Detector.{Pos/R}cfg.detposNx4 arrayDetector positions and radiiYYYYYYYY
Forward.N0cfg.n0floatBackground refractive indexYYYY
MC Settings -f--input-stringInput file (.json or .inp)YYYYYYYY
Session.Photons-n--photoncfg.nphotoninteger (0)Total photon numberYYYYYYYY
-r--repeatcfg.repeatinteger (1)Repeat count (positive int)YYYY
Session.DoMismatch-b--reflectcfg.isreflectbool (1)Whether to do reflection/transmissionYYYYYYYY
-B--bccfg.bc6-char-string (______)Boundary conditions at 6 directionsYYYY
Domain.LengthUnit-u--unitinmmcfg.unitinmmfloat (1)Voxel edge length in mmYYYYYYYY
Session.DoNormalize-U--normalizecfg.isnormalizebool (1)Whether to normalize the solutionsYYYYYYYY
Session.RNGSeed-E--seedcfg.seedinteger (0)RNG seed (or a .mch file if replay)YYYYYYYY
Domain.OriginType-z--srcfrom0cfg.issrcfrom0bool (0)Whether the lower-corner of the domain is 0,0,0YYYY
-R--skipradiuscfg.skipradiusfloat (-2)Whether to use atomic operationsYYYY
-k--voidtimecfg.voidtimebool (1)Whether to count the time-of-flight before entryYYYYYYYY
-Y--replaydetcfg.replaydetinteger (-1)Which detetor to be replayedYYYYYYYY
Session.DoSpecular-V--specularcfg.isspecularbool (1)Whether to do specular reflection upon entryYYYYYYYY
-e--minenergycfg.minenergyfloat (0)Minimum energy to trigger Russian RouletteYYYYYYYY
-g--gategroupcfg.maxgateinteger (1)Maximum time gate to be simulated togetherYYYYYY
GPU Settings-L--listgpumcxlab('gpuinfo')List available GPUsYYYYYY
-t--threadcfg.nthreadinteger (16384)Number of total threadsYYYYYY
-T--blocksizecfg.nblocksizeinteger (64)Size of thread blockYYYYYY
Session.DoAutoThread-A--autopilotcfg.autopilotbool (1)Choosing thread/block automaticallyYYYYYY
-G--gpucfg.gpuidinteger (1) or 01 stringSpecify which GPUs to useYYYYYY
-W--workloadcfg.workloadfloat,float,...Workload split between GPUsYYYYYY
-I--printgpu-Print GPU information then run simulationYY
Input Shapes-P--shapescfg.shapesJSON string '{...}'JSON-based domain descriptorsYYYY
Domain.MediaFormat-K--mediabytearray types in cfg.vol1,2,4,101,... (1)Volume data voxel formatYYYY
-a--array-bool (0)Whether the array is in row-majorYY
Output Settings Session.ID-s--session-a sring ('default')Output file stubYYYY
Session.OutputType-O--outputtypecfg.outputtypeXFEJPM (X)Output data typeYYYYYYYY
Session.DoPartialPath-d--savedet2nd output of mcxlabbool (1)Whether to save detected photonsYYYYYYYY
Session.SaveDataMask-w--savedetflagcfg.savedetflagDSPMXVW (DP)What fields to save per detected photonYYYY
Session.DoSaveExit-x--saveexitcfg.issaveexitbool (0)Whether to save exit positions and dirYYYYYYYY
-X--saverefcfg.issaverefbool (0)Whether to save diffuse reflectanceYYYYYYYY
Session.DoDCS-m--momentumcfg.ismomentumbool (0)Whether to save momentum transferYYYYYYYY
Session.DoSaveSeed-q--saveseedcfg.issaveseedbool (0)Whether to save RNG seeds for replayYYYYYYYY
-M--dumpmask3rd output of mcxlabbool (0)Return the preprocessed volumeYYYY
-H--maxdetphotoncfg.maxdetphotoninteger (1000000)Maximum count of detected photonYYYYYYYY
Session.DoSaveVolume-S--save2pt1st output of mcxlabbool (1)Whether to save fluenceYYYYYYYY
Session.OutputFormat-F--outputformat-mc2,nii,hdr (mc2)Output file formatYYYY
User IO-h--helphelp mcxlabPrint help infoYYYYYYYY
-v--version-Print version infoYY
-l--log-bool (0)Print info to a fileYYYY
-i--interactive-Interactive modeYYYY
Advanced Settings Session.Debug-D--debugcfg.debuglevelRMP ('')Debug flagsYYYYYYYY
-k--kernel-string ('')Path to a user-specified kernel fileY
-o--optlevelcfg.optlevel0,1,2,3 (3)OpenCL optimization levelYY
-J--compileropt-string ('')OpenCL JIT compiler flagsYY
Session.RootPath--rootcfg.rootstring ('')Root path of the output filesYYYY
--gscattercfg.gscatterinteger (1e9)Number of scatter events before isotropic scatteringYYYYYYYY
--maxvoidstepcfg.maxvoidstepinteger (1000)Maximum steps in the backgroundYYYY
--maxjumpdebugcfg.maxjumpdebuginteger (10000000)Maximum trajectory pointsYYYY
--internalsrccfg.internalsrcbool (0)A point source inside the non-zero voxelYY
Help
Click on the items below to show help info
MCXLAB
MCXLAB is the native MEX version of MCX for Matlab and GNU Octave. It compiles
the entire MCX code into a MEX function which can be called directly inside
Matlab or Octave. The input and output files in MCX are replaced by convenient
in-memory struct variables in MCXLAB, thus, making it much easier to use 
and interact. Matlab/Octave also provides convenient plotting and data
analysis functions. With MCXLAB, your analysis can be streamlined and speed-
up without involving disk files.

Because MCXLAB contains the exact computational codes for the GPU calculations
as in the MCX binaries, MCXLAB is expected to have identical performance when
running simulations. By default, we compile MCXLAB with the support of recording
detected photon partial path-lengths (i.e. the "make det" option). In addition,
we also provide "mcxlab_atom": an atomic version of mcxlab compiled similarly
as "make detbox" for MCX. It supports atomic operations using shared memory
enabled by setting "cfg.sradius" input parameter to a positive number.
MCXStudio
MCXStudio is a cross-platform easy-to-use GUI to use with MCX, MMC and MCXCL. Click on the items below to show help info
Installation
MCX supports near all GPUs produced by NVIDIA after 2010. The pre-compiled binaries provided in 
our released packages support "Fermi" (circa 2010) and newer GPUs made by NVIDIA, even including future generations.

Please use the following steps to determine if all needed libraries are properly
installed on your computer.

MCXLAB: installation
MCXLAB is a toolbox for MATLAB and GNU Octave to enable streamlined MCX simulations in these platforms.

The core functionalities of the MCXLAB toolbox is provided by a MATLAB function mcxlab.m and 
the mcx.mex* mex file. The mcxlab.m script provides pre-/post-processing of MCX data, and mcx.mex
file executes the actual GPU-based simulations.

The system requirements for MCXLAB are the same as MCX: you have to make
sure that you have a CUDA-capable graphics card with properly configured 
graphics driver (you can run the standard MCX binary first to test if your 
system is capable to run MCXLAB). Of course, you need to have either Matlab
or Octave installed.

Once you set up the CUDA toolkit and NVIDIA driver, you can then add the 
"mcxlab" directory to your Matlab/Octave search path using the addpath command.
If you want to add this path permanently, please use the "pathtool" 
command, or edit your startup.m (~/.octaverc for Octave).

If everything works ok, typing "help mcxlab" in Matlab/Octave will print the
help information. If you see any error, particularly any missing libraries,
please make sure you have downloaded the matching version built for your
platform. 
MCXLAB: first example
Let's take a look at one of the simplest examples provided in 
mcxlab/examples/demo_mcxlab_basic.m demo script


cfg.nphoton=1e7;                     % define total simulated photon number
cfg.vol=uint8(ones(60,60,60));       % define the volume - here a homogeneous 60x60x60 mm^3 domain with label 1
cfg.srcpos=[30 30 1];                % source position in voxel unit (may be different from mm)
cfg.srcdir=[0 0 1];                  % unitary vector defining the initial incident direction of photons
cfg.prop=[0 0 1 1;0.005 1 0 1.37];   % define optical properties [mua (1/mm),mus (1/mm), g and n] for each tissue type; first one reserved for background/air, i.e. label 0
cfg.tstart=0;                        % start of the simulation time window (in second)
cfg.tend=5e-9;                       % end of the simulation time window (in second)
cfg.tstep=1e-10;                     % time gate width (in second), here we asks mcxlab to a "videos" at 50 time gates

cfg.gpuid=1; % cfg.gpuid='11';       % =1 use the first GPU, =2, use the 2nd, ='11' use both GPUs together
cfg.autopilot=1;                     % let mcxlab to automatically decide the threads/blocks

fluencerate=mcxlab(cfg);             % calculate the normalized time-resolved fluence rate at all voxel locations
fluence=sum(fluencerate,4)*cfg.tstep;% calculate the CW fluence by integrating the time axis and multiple time gate width
In the above example, you can see that only a few lines is needed to define a fully functional mcxlab simulation. Except for "cfg.gpuid" and "cfg.autopilot", all above defined subfields in the cfg parameter are the minimally required parameters.
MCXLAB: GPU speed contest
At the below web page

  http://mcx.space/gpubench
  
we maintain a GPU benchmark database characterizing the MCX/MCXLAB simulation speed at wide-range
of GPU architectures and graphics cards. The speed data in this database were submitted by our 
developers or contributed by our users, like you. To participate, please download MCXLAB and 
run the mcx_gpu_contest.m script (under examples) inside MATLAB, or run the 
speedcontest/mcxcontest script (Windows requires either Cygwin or MSYS2).

We used 3 built-in benchmarks (list using 'mcx --bench'), 'cube60', 'cubesph60b' and 'cube60planar'
to characterize the overall speed for a range of domain settings and simulation types supported by
mcx. The score of this gpu contest script is basically the summation of the speeds in photons/ms 
in of the 3 benchmarks. The higher the score, the better overall performance of mcx on the tested
GPU.

MCXLAB: test built-in examples
In the mcxlab/example folder, we provided over a dozen built-in example scripts. In these 
example scripts, we show users how to use mcxlab to create and execute simulations and display the results. Reading
these examples and understand the purposes for each setting is greatly helpful when you customize those with
your own simulations.

==== demo_mcxlab_basic.m ====

In this example, we show the most basic usage of MCXLAB. This include
how to define the input configuration structure, launch MCX simulations
and interpret and plotting the resulting data.

==== demo_validation_homogeneous.m ====

In this example, we validate MCXLAB with a homogeneous medium in a 
cubic domain. This is exactly the example shown in Fig.5 of [Fang2009].

You can also use the alternative optical properties that has a high g
value to observe the similarity between the two scattering/g configurations.

==== demo_validation_heterogeneous.m ====

In this example, we validate the MCXLAB solver with a heterogeneous
domain and the analytical solution of the diffusion model. We also 
demonstrate how to use sub-pixel resolution to refine the representation
of heterogeneities. The domain is consisted of a 6x6x6 cm box with a 
2cm diameter sphere embedded at the center. 

This test is identical to that used for Fig. 3 in [Fang2010].

==== demo_fullhead_atlas.m ====
In this example, we demonstrate light transport simulation in a full-head 
atlas template(USC 19.5 year group[Sanchez2012]). 
This demo is identical to the MCX simulation used for Fig.9(a) in
[TranYan2019](submitted).

==== demo_mcxyz_skinvessel.m ====
In this example, we compare between MCX and mcxyz written by Dr. Steve Jacques.
The same benchmark can be found at https://omlc.org/software/mc/mcxyz/index.html

==== demo_digimouse_sfdi.m ====
This simulates a widefield SFDI source using the Digimouse atlas. There are
21 tissue types in the atlas.

==== demo_4layer_head.m ====

In this example, we simulate a 4-layer brain model using MCXLAB.
We will investigate the differences between the solutions with and 
witout boundary reflections (both external and internal) and show
you how to display and analyze the resulting data.

==== demo_mcxlab_srctype.m ====
This demo script shows how to use 9 different types sources in your
simulations. These 9 source types include pencil beam, isotropic source,
Gaussian beam, uniform plannar source, uniform disk source, Fourier 
pattern illumuniation (spatial frequency domain sources), arcsine 
distribution beam, uniform cone beam, and an arbitrary light pattern 
(defined by a 2D image).

==== demo_mcxlab_2d.m ====
In this example, we show how to use MCX to run a 2D simulation.
You must define a 3D array with one singleton dimension (with length 1).
unfortunately if you define z as singleton, matlab will make the array 2D
instead of 3D, so we have to purmute it to make the 1st dimension
singleton.

==== demo_photon_sharing.m ====
This script demonstrates the "photon sharing" feature (Yao&Yan et al, 2019, 
Photonics West) to simultaneously create forward solutions of multiple
patterned source.

==== demo_replay_timedomain.m ====
In this example, we show how to use replay to obtain time-resolved
Jacobians - setting cfg.replaydet to -1 to replay all detectors.

==== demo_replay_vs_pmc_timedomain.m ====
In this example, we compare perturbation MC and replay in predicting
time-resolved measurement change with respect to mua change in a layer.

==== demo_sphere_cube_subpixel.m ====

In this example, we demonstrate how to use sub-pixel resolution 
to represent the problem domain. The domain is consisted of a 
6x6x6 cm box with a 2cm diameter sphere embedded at the center.

MCXLAB: verify MCXLAB installation
To verify if MCXLAB has been installed and is compatible with your system, please first run 

    which mcx

inside MATLAB or GNU Octave. If the above command prints a path to the mcx.mex* file that you have installed, that means the MCXLAB is now installed on your MATLAB or Octave. Next, you need to verify if your GPU hardware is properly configured for MCX. You should run

    info=mcxlab('gpuinfo')

If your system has an NVIDIA GPU and is properly configured, you should get non-empty output. Otherwise, please verify is your GPU driver was properly installed, and reinstall if needed.
MCXLAB: help info
MCXLAB accepts the below input parameters (type help mcxlab to display)

 ====================================================================
 

MCXLAB - Monte Carlo eXtreme (MCX) for MATLAB/GNU Octave

-------------------------------------------------------------------- Copyright (c) 2011-2019 Qianqian Fang (q.fang at neu.edu) URL: http://mcx.space ====================================================================

Format:

fluence=mcxlab(cfg); or [fluence,detphoton,vol,seed,trajectory]=mcxlab(cfg); [fluence,detphoton,vol,seed,trajectory]=mcxlab(cfg, option);

Input:

cfg: a struct, or struct array. Each element of cfg defines the parameters associated with a simulation. if cfg='gpuinfo': return the supported GPUs and their parameters, see sample script at the bottom option: (optional), options is a string, specifying additional options option='preview': this plots the domain configuration using mcxpreview(cfg) option='opencl': force using mcxcl.mex* instead of mcx.mex* on NVIDIA/AMD/Intel hardware option='cuda': force using mcx.mex* instead of mcxcl.mex* on NVIDIA GPUs if one defines USE_MCXCL=1 in MATLAB command line window, all following mcxlab and mcxlabcl calls will use mcxcl.mex; by setting option='cuda', one can force both mcxlab and mcxlabcl to use mcx (cuda version). Similarly, if USE_MCXCL=0, all mcxlabcl and mcxlab call will use mcx.mex by default, unless one set option='opencl'. cfg may contain the following fields:

== Required ==

*cfg.nphoton: the total number of photons to be simulated (integer) maximum supported value is 2^63-1 *cfg.vol: a 3D array specifying the media index in the domain. can be uint8, uint16, uint32, single or double arrays. 2D simulations are supported if cfg.vol has a singleton dimension (in x or y); srcpos/srcdir must belong to the 2D plane in such case. for 2D simulations, Example: demo_mcxlab_2d.m mcxlab also accepts 4D arrays to define continuously varying media. The following formats are accepted 1 x Nx x Ny x Nz float32 array: mua values for each voxel (must use permute to make 1st dimension singleton) 2 x Nx x Ny x Nz float32 array: mua/mus values for each voxel (g/n use prop(2,:)) 4 x Nx x Ny x Nz uint8 array: mua/mus/g/n gray-scale (0-255) interpolating between prop(2,:) and prop(3,:) 2 x Nx x Ny x Nz uint16 array: mua/mus gray-scale (0-65535) interpolating between prop(2,:) and prop(3,:) Example: demo_continuous_mua_mus.m. If voxel-based media are used, partial-path/momentum outputs are disabled *cfg.prop: an N by 4 array, each row specifies [mua, mus, g, n] in order. the first row corresponds to medium type 0 (background) which is typically [0 0 1 1]. The second row is type 1, and so on. The background medium (type 0) has special meanings: a photon terminates when moving from a non-zero to zero voxel. *cfg.tstart: starting time of the simulation (in seconds) *cfg.tstep: time-gate width of the simulation (in seconds) *cfg.tend: ending time of the simulation (in second) *cfg.srcpos: a 1 by 3 vector, the position of the source in grid unit *cfg.srcdir: a 1 by 3 vector, specifying the incident vector; if srcdir contains a 4th element, it specifies the focal length of the source (only valid for focuable src, such as planar, disk, fourier, gaussian, pattern, slit, etc); if the focal length is nan, all photons will be launched isotropically regardless of the srcdir direction.

== MC simulation settings ==

cfg.seed: seed for the random number generator (integer) [0] if set to a uint8 array, the binary data in each column is used to seed a photon (i.e. the "replay" mode) Example: demo_mcxlab_replay.m cfg.respin: repeat simulation for the given time (integer) [1] if negative, divide the total photon number into respin subsets cfg.isreflect: [1]-consider refractive index mismatch, 0-matched index cfg.bc per-face boundary condition (BC), a strig of 6 letters (case insensitive) for bounding box faces at -x,-y,-z,+x,+y,+z axes; overwrite cfg.isreflect if given. each letter can be one of the following: '_': undefined, fallback to cfg.isreflect 'r': like cfg.isreflect=1, Fresnel reflection BC 'a': like cfg.isreflect=0, total absorption BC 'm': mirror or total reflection BC 'c': cyclic BC, enter from opposite face cfg.isnormalized:[1]-normalize the output fluence to unitary source, 0-no reflection cfg.isspecular: 1-calculate specular reflection if source is outside, [0] no specular reflection cfg.maxgate: the num of time-gates per simulation cfg.minenergy: terminate photon when weight less than this level (float) [0.0] cfg.unitinmm: defines the length unit for a grid edge length [1.0] Example: demo_sphere_cube_subpixel.m cfg.shapes: a JSON string for additional shapes in the grid Example: demo_mcxyz_skinvessel.m cfg.gscatter: after a photon completes the specified number of scattering events, mcx then ignores anisotropy g and only performs isotropic scattering for speed [1e9]

== GPU settings ==

cfg.autopilot: 1-automatically set threads and blocks, [0]-use nthread/nblocksize cfg.nblocksize: how many CUDA thread blocks to be used [64] cfg.nthread: the total CUDA thread number [2048] cfg.gpuid: which GPU to use (run 'mcx -L' to list all GPUs) [1] if set to an integer, gpuid specifies the index (starts at 1) of the GPU for the simulation; if set to a binary string made of 1s and 0s, it enables multiple GPUs. For example, '1101' allows to use the 1st, 2nd and 4th GPUs together. Example: mcx_gpu_benchmarks.m cfg.workload an array denoting the relative loads of each selected GPU. for example, [50,20,30] allocates 50%, 20% and 30% photons to the 3 selected GPUs, respectively; [10,10] evenly divides the load between 2 active GPUs. A simple load balancing strategy is to use the GPU core counts as the weight. cfg.isgpuinfo: 1-print GPU info, [0]-do not print

== Source-detector parameters ==

cfg.detpos: an N by 4 array, each row specifying a detector: [x,y,z,radius] cfg.maxdetphoton: maximum number of photons saved by the detectors [1000000] cfg.srctype: source type, the parameters of the src are specified by cfg.srcparam{1,2} Example: demo_mcxlab_srctype.m 'pencil' - default, pencil beam, no param needed 'isotropic' - isotropic source, no param needed 'cone' - uniform cone beam, srcparam1(1) is the half-angle in radian 'gaussian' [*] - a collimated gaussian beam, srcparam1(1) specifies the waist radius (in voxels) 'planar' [*] - a 3D quadrilateral uniform planar source, with three corners specified by srcpos, srcpos+srcparam1(1:3) and srcpos+srcparam2(1:3) 'pattern' [*] - a 3D quadrilateral pattern illumination, same as above, except srcparam1(4) and srcparam2(4) specify the pattern array x/y dimensions, and srcpattern is a floating-point pattern array, with values between [0-1]. if cfg.srcnum>1, srcpattern must be a floating-point array with a dimension of [srcnum srcparam1(4) srcparam2(4)] Example: demo_photon_sharing.m 'pattern3d' [*] - a 3D illumination pattern. srcparam1{x,y,z} defines the dimensions, and srcpattern is a floating-point pattern array, with values between [0-1]. 'fourier' [*] - spatial frequency domain source, similar to 'planar', except the integer parts of srcparam1(4) and srcparam2(4) represent the x/y frequencies; the fraction part of srcparam1(4) multiplies 2*pi represents the phase shift (phi0); 1.0 minus the fraction part of srcparam2(4) is the modulation depth (M). Put in equations: S=0.5*[1+M*cos(2*pi*(fx*x+fy*y)+phi0)], (0<=x,y,M<=1) 'arcsine' - similar to isotropic, except the zenith angle is uniform distribution, rather than a sine distribution. 'disk' [*] - a uniform disk source pointing along srcdir; the radius is set by srcparam1(1) (in grid unit) 'fourierx' [*] - a general Fourier source, the parameters are srcparam1: [v1x,v1y,v1z,|v2|], srcparam2: [kx,ky,phi0,M] normalized vectors satisfy: srcdir cross v1=v2 the phase shift is phi0*2*pi 'fourierx2d' [*] - a general 2D Fourier basis, parameters srcparam1: [v1x,v1y,v1z,|v2|], srcparam2: [kx,ky,phix,phiy] the phase shift is phi{x,y}*2*pi 'zgaussian' - an angular gaussian beam, srcparam1(0) specifies the variance in the zenith angle 'line' - a line source, emitting from the line segment between cfg.srcpos and cfg.srcpos+cfg.srcparam(1:3), radiating uniformly in the perpendicular direction 'slit' [*] - a colimated slit beam emitting from the line segment between cfg.srcpos and cfg.srcpos+cfg.srcparam(1:3), with the initial dir specified by cfg.srcdir 'pencilarray' - a rectangular array of pencil beams. The srcparam1 and srcparam2 are defined similarly to 'fourier', except that srcparam1(4) and srcparam2(4) are both integers, denoting the element counts in the x/y dimensions, respectively. For exp., srcparam1=[10 0 0 4] and srcparam2[0 20 0 5] represent a 4x5 pencil beam array spanning 10 grids in the x-axis and 20 grids in the y-axis (5-voxel spacing) source types marked with [*] can be focused using the focal length parameter (4th element of cfg.srcdir) cfg.{srcparam1,srcparam2}: 1x4 vectors, see cfg.srctype for details cfg.srcpattern: see cfg.srctype for details cfg.srcnum: the number of source patterns that are simultaneously simulated; only works for 'pattern' source, see cfg.srctype='pattern' for details Example demo_photon_sharing.m cfg.issrcfrom0: 1-first voxel is [0 0 0], [0]- first voxel is [1 1 1] cfg.replaydet: only works when cfg.outputtype is 'jacobian', 'wl', 'nscat', or 'wp' and cfg.seed is an array -1 replay all detectors and save in separate volumes (output has 5 dimensions) 0 replay all detectors and sum all Jacobians into one volume a positive number: the index of the detector to replay and obtain Jacobians cfg.voidtime: for wide-field sources, [1]-start timer at launch, or 0-when entering the first non-zero voxel

== Output control ==

cfg.savedetflag: ['dp'] - a string (case insensitive) controlling the output detected photon data fields 1 d output detector ID (1) 2 s output partial scat. even counts (#media) 4 p output partial path-lengths (#media) 8 m output momentum transfer (#media) 16 x output exit position (3) 32 v output exit direction (3) 64 w output initial weight (1) combine multiple items by using a string, or add selected numbers together by default, mcx only saves detector ID (d) and partial-path data (p) cfg.issaveexit: [0]-save the position (x,y,z) and (vx,vy,vz) for a detected photon same as adding 'xv' to cfg.savedetflag. Example: demo_lambertian_exit_angle.m cfg.ismomentum: 1 to save photon momentum transfer,[0] not to save. save as adding 'M' to cfg.savedetflag string cfg.issaveref: [0]-save diffuse reflectance/transmittance in the non-zero voxels next to a boundary voxel. The reflectance data are stored as negative values; must pad zeros next to boundaries Example: see the demo script at the bottom cfg.outputtype: 'flux' - fluence-rate, (default value) 'fluence' - fluence integrated over each time gate, 'energy' - energy deposit per voxel 'jacobian' or 'wl' - mua Jacobian (replay mode), 'nscat' or 'wp' - weighted scattering counts for computing Jacobian for mus (replay mode) for type jacobian/wl/wp, example: demo_mcxlab_replay.m and demo_replay_timedomain.m cfg.session: a string for output file names (only used when no return variables)

== Debug ==

cfg.debuglevel: debug flag string (case insensitive), one or a combination of ['R','M','P'], no space 'R': debug RNG, output fluence.data is filled with 0-1 random numbers 'M': return photon trajectory data as the 5th output 'P': show progress bar cfg.maxjumpdebug: [10000000|int] when trajectory is requested in the output, use this parameter to set the maximum position stored. By default, only the first 1e6 positions are stored. fields with * are required; options in [] are the default values

Output:

fluence: a struct array, with a length equals to that of cfg. For each element of fluence, fluence(i).data is a 4D array with dimensions specified by [size(vol) total-time-gates]. The content of the array is the normalized fluence at each voxel of each time-gate. detphoton: (optional) a struct array, with a length equals to that of cfg. Starting from v2018, the detphoton contains the below subfields: detphoton.detid: the ID(>0) of the detector that captures the photon detphoton.nscat: cummulative scattering event counts in each medium detphoton.ppath: cummulative path lengths in each medium (partial pathlength) one need to multiply cfg.unitinmm with ppath to convert it to mm. detphoton.mom: cummulative cos_theta for momentum transfer in each medium detphoton.p or .v: exit position and direction, when cfg.issaveexit=1 detphoton.w0: photon initial weight at launch time detphoton.prop: optical properties, a copy of cfg.prop detphoton.data: a concatenated and transposed array in the order of [detid nscat ppath mom p v w0]' "data" is the is the only subfield in all mcxlab before 2018 vol: (optional) a struct array, each element is a preprocessed volume corresponding to each instance of cfg. Each volume is a 3D int32 array. seeds: (optional), if give, mcxlab returns the seeds, in the form of a byte array (uint8) for each detected photon. The column number of seed equals that of detphoton. trajectory: (optional), if given, mcxlab returns the trajectory data for each simulated photon. The output has 6 rows, the meanings are id: 1: index of the photon packet pos: 2-4: x/y/z/ of each trajectory position 5: current photon packet weight 6: reserved By default, mcxlab only records the first 1e7 positions along all simulated photons; change cfg.maxjumpdebug to define a different limit.

Example:

% first query if you have supported GPU(s) info=mcxlab('gpuinfo') % define the simulation using a struct cfg.nphoton=1e7; cfg.vol=uint8(ones(60,60,60)); cfg.vol(20:40,20:40,10:30)=2; % add an inclusion cfg.prop=[0 0 1 1;0.005 1 0 1.37; 0.2 10 0.9 1.37]; % [mua,mus,g,n] cfg.issrcfrom0=1; cfg.srcpos=[30 30 1]; cfg.srcdir=[0 0 1]; cfg.detpos=[30 20 1 1;30 40 1 1;20 30 1 1;40 30 1 1]; cfg.vol(:,:,1)=0; % pad a layer of 0s to get diffuse reflectance cfg.issaveref=1; cfg.gpuid=1; cfg.autopilot=1; cfg.tstart=0; cfg.tend=5e-9; cfg.tstep=5e-10; % calculate the fluence distribution with the given config [fluence,detpt,vol,seeds,traj]=mcxlab(cfg); % integrate time-axis (4th dimension) to get CW solutions cwfluence=sum(fluence.data,4); % fluence rate cwdref=sum(fluence.dref,4); % diffuse reflectance % plot configuration and results subplot(231); mcxpreview(cfg);title('domain preview'); subplot(232); imagesc(squeeze(log(cwfluence(:,30,:))));title('fluence at y=30'); subplot(233); hist(detpt.ppath(:,1),50); title('partial path tissue#1'); subplot(234); plot(squeeze(fluence.data(30,30,30,:)),'-o');title('TPSF at [30,30,30]'); subplot(235); 
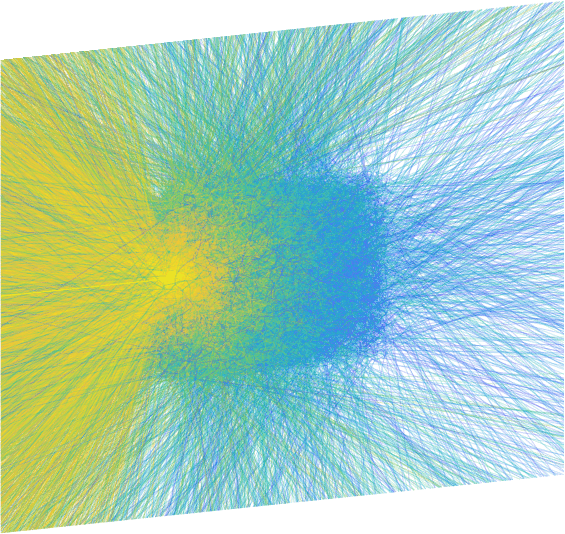
newtraj=mcxplotphotons(traj);title('photon trajectories') subplot(236); imagesc(squeeze(log(cwdref(:,:,1))));title('diffuse refle. at z=1'); This function is part of Monte Carlo eXtreme (MCX) URL: http://mcx.space License: GNU General Public License version 3, please read LICENSE.txt for details
Installation: GPU Hardware
Your computer must have a CUDA-enabled GPU.

Generally speaking, all graphics cards made by NVIDIA after 2010 are CUDA-enabled.
However, if you use an integrated GPU (Intel) or AMD GPU, you may not run MCX
(you should consider MCXCL).

The more cores (stream processors) in your GPU generally means better simulation
speed. On the other hand, MCX does not require a large GPU memory. Therefore,
a NVIDIA Tesla card is not entirely needed unless you need to simulate a very
large domain with many time-gates.

If you are not sure what type of graphics card on your operating system, please
use the following instructions:

* Windows: download and run gpu-z, a freeware.
* Mac OSX: open a terminal, run command "system_profiler"
* Linux: open a terminal, run command "lspci | grep -i --color 'vga\|3d\|2d'"

You should see at least one NVIDIA graphics card that is available. In addition,
you should also have installed the proper driver for the graphics card. Please
consult your graphics card installation guide for details.

Installation: GPU driver
You must install the proper GPU driver in order for MCX to access your
GPU hardware. If you have already been using your NVIDIA GPU for computer display and graphics
rendering, this has been typically completed as part of your computer installation.

To download the latest driver, please use the below URL:

https://www.nvidia.com/Download/index.aspx

If you experience trouble using the graphics on your computer, it typically indicate a graphics
driver problem, and you must fix the graphics driver problem before using MCX.

Starting from MCX 2017.3, the additional installation of CUDA libraries is no longer needed. 
CUDA libraries are now directly built into the MCX/MCXLAB binaries.

For Windows users, starting from 1.0-beta, we have included the needed
library files (.dll on windows) in our binary packages. However, if you run mcx
and receive an error message complaining about "cuda*.dll is missing", please search
this file name in a search engine and find a download link. Once you download the
dll file, you should save it under your Windows folder (typically C:\Windows).

Installation: Initial test
Once you have verified your GPU hardware and proper installation of GPU drivers,
you may test MCX by the following command

    mcx -L

type this in a terminal (In Windows, Start menu\Run\cmd). You should see a list
of supported graphics card(s). If you see an error, that means either your hardware
does not support MCX, or CUDA library is missing.

You may also run nvidia tool "nvidia-smi" on your computer to make sure you
can see CUDA-capable GPU listed. If not, it is likely your NVIDIA driver or
GPU hardware was not properly installed.

Run: show mcx help
Runing "mcx" without parameter prints the help information, including
all supported command line options. This is also the first command to test after
installing mcx. If your see an error, such as missing libraries, this typically
indicates a problem with your NVIDIA driver or CUDA toolkit
Run: list GPU
Runing "mcx -L" lists all supported GPUs on your computer. A sample output
looks like below:

fangq@wazu:mcx/bin$ ./mcx -L
=============================   GPU Infomation  ================================
Device 1 of 4:		GeForce GTX 980 Ti
Compute Capability:	5.2
Global Memory:		2147287040 B
Constant Memory:	65536 B
Shared Memory:		49152 B
Registers:		65536
Clock Speed:		1.19 GHz
Number of MPs:		22
Number of Cores:	2816
SMX count:		22
=============================   GPU Infomation  ================================
Device 2 of 4:		GeForce GTX 590
Compute Capability:	2.0
Global Memory:		1610285056 B
Constant Memory:	65536 B
Shared Memory:		49152 B
Registers:		32768
Clock Speed:		1.26 GHz
Number of MPs:		16
Number of Cores:	512
SMX count:		16
=============================   GPU Infomation  ================================
Device 3 of 4:		GeForce GTX 590
Compute Capability:	2.0
Global Memory:		1609760768 B
Constant Memory:	65536 B
Shared Memory:		49152 B
Registers:		32768
Clock Speed:		1.26 GHz
Number of MPs:		16
Number of Cores:	512
SMX count:		16
=============================   GPU Infomation  ================================
Device 4 of 4:		GeForce GT 730
Compute Capability:	3.5
Global Memory:		1073545216 B
Constant Memory:	65536 B
Shared Memory:		49152 B
Registers:		65536
Clock Speed:		0.90 GHz
Number of MPs:		2
Number of Cores:	384
SMX count:		2

Run: autopilot mode
The command "mcx -A -n 1e6 -f input.json" asks mcx to simulate 10^6 photons (-n)
using the settings specified (-f) in the input file "input.json"; it also asks
mcx to automatically configure (-A) the thread and block sizes to maximize
speed. If the simulation successfully completes, an output named "input.json.mc2"
will be created in the current folder.

In the autopilot mode, mcx uses a built-in huristic algorithm to determine the
thread and block sizes. The goal is to launch as many threads as possible to keep
all GPU hardware busy, thus achieving maximized efficiency
Run: session name and voxel size
The command "mcx -A -n 1e6 -f input.json -s test -u 0.5" adds two additional
options to the previous command:

-s test: instead of writing the output file as input.json.mc2, the output files
         will be named as test.mc2

-u 0.5:  by default, mcx assumes isotropic 1 x 1 x 1 mm^3 voxels in the volume;
         if your volume has a voxel dimension larger or smaller than 1mm, you
         may specify it by the -u flag. Here we say all voxels are
         0.5 x 0.5 x 0.5 mm^3 in size
Run: manual thread configuration
Instead of using the autopilot mode (-A), in this command,
"mcx -t 10240 -T 32 -n 1e6 -f input.json", we explicitly specify the thread
and block sizes using the -t and -T flags, respectively. 
Preparation
Click on the items below to show help info
Output

Overall, MCX/MCXLAB produces 3 types of output data: 

1. volumetric data
2. detected photon data, and
3. photon trajectories

The first type of outputs are typically stored as a 3D, 4D or 5D single-precision floating-point
array. By default, this volumetric output is the normalized fluence rate (W/mm^2 or J/(s*mm^2))
as a 4D array, with first 3 dimensions as x/y/z and the last dimension is the time-gate. However,
by using the '--outputtype' flag or cfg.outputtype, one can also ask MCX to output fluence,
energy density, or Jacobian of mua (in the replay mode). These outputs are also in the form of a 
3D or 4D array. When "photon-sharing" is used, the output data corresponding to all simultaneously
simulated source patterns are stored as a 5D array. The default output file format for the volumetric
data is ".mc2" - a simple binary buffer dump of the 3D/4D/5D floating-point buffer in the column-major 
order. It is highly recommended to use '-F jnii' or '-F bnii' or '-F nii' to store this output as 
JSON, binary JSON or NIfTI format for greater portability and readability (if saved as .jnii).
These files can be loaded to MATLAB using loadmc2, loadjson or loadbj commands, respectively.
This output can be disabled by setting '--save2pt 0' or cfg.issave2pt=0.

The 2nd type of outputs are typically stored in the form of a binary 2D array encoded in a '.mch' 
(MC history file). The .mch file contains a simple 256-byte header, followed by a Np x Nc 2D 
floating-point array, where Np is the number of detected photons, and Nc is the number of the 
per-photon data numbers, or columns. The per-photon data includes the index of the 
detector, the partial pathlengths, partial-scattering-counts, etc. One can specify the output
columns by using -w or --savedetflag following by a series of characters. If -q or --saveseed is 
set, a block of Np x Nb byte-array follows the main data table, storing the per-photon RNG 
seeds, where Nb is the number of bytes per RNG seed. The default output
file format is .mch, however, you are also recommended to use -F jnii or -F bnii to save those
into JSON or binary JSON format. If jnii or bnii output is used, the detected photon data are stored
under the "PhotonData" key under "MCXData" root object, and the photon seeds, if desired, are stored
under the "Seed" key. This output can be disabled by setting --savedet 0 or ignoring
the 2nd output of mcxlab.

The 3rd type of outputs are also by default stored in a '.mch' formatted file, but renamed as 
.mct for better management. The .mct file has exactly the same format as .mch, containing
a 2D table of Np x 6 floating point array, where Np is the simulated photons, and the fields in 
the columns are 
  photonid, x, y,z, weight, reserved
When -F jnii or -F bnii is used, this output is merged with the 2nd output file and all
trajectory data are stored under "Trajectory" key under the "MCXData" root object. This output
can be enabled by "-D M" or asking mcxlab to return the 5th output.

Run
Click the sample command below to show help info
report-bugs

MCX Cloud

MCX Cloud is a free cloud-computing service that we provide to our user community to run scalable MCX simulations without requiring users to install their own GPUs. The full technical details of MCX Cloud are described in this paper.

MCX Cloud is built on top of a list of modern, standardized and scalable technologies, including

Run MCX Cloudβ Watch Tutorial
report-bugs

MCX'19 logoMCX'19 Workshop

The 3rd International MCX/MMC Training Workshop was successfully held on Aug. 8 and 9, 2019 on the Boston campus of Northeastern University, USA. This year, we have 34 participants coming from 7 different countries. Six students have received travel grants after a competitive selection. See agenda and past workshops

In this workshop, we provided users hands-on training on building fast and accurate Monte Carlo (MC) biophotonics simulations using our open-source software - MCX (GPU accelerated MC simulator) and MMC (Mesh-based MC for accurate anatomical modeling). We have covered

  • Using MCX Studio to rapidly design MC-based biophotonics simulations and visualize results.
  • Designing MATLAB-streamlined MC-based analysis using MCXLAB and MMCLAB.
  • Tips on efficiently using NVIDIA/AMD/Intel CPUs and GPUs for MCX/MCXCL.
  • Creating 3D anatomically accurate brain mesh models using Brain2Mesh/Iso2Mesh toolboxes and fNIRS modeling.
  • (!NEW!) Redbird-m, a fast MATLAB-based diffusion forward/inverse solver, interop with MCXLAB/MMCLAB.

No prior experience with MCX/MMC is required. Participants must bring their own laptop, with a MATLAB (or demo version) pre-installed. Seats limited. Travel grant available for students.

See Album
bugs-spray
captcha
Go Back
MCX/MCX-CL
[Yan 2022] - Polarization-MCX(NEW!)
[Fang 2022] - MCX Cloud (NEW!)
[Yan 2020] - Split-Voxel MC
[Yu 2018] - MCX-OpenCL
[Fang 2009] - Original MCX paper
Mesh-based MC (MMC)
[Zhang 2022] - BlenderPhotonics(NEW!)
[Yuan 2021] - Implicit MMC
[Fang 2019] - GPU (OpenCL) MMC
[Yan 2019] - Dual-grid MMC
[Fang 2012] - SIMD MMC
[Fang 2011] - MMC comparison
[Fang 2010] - Original MMC paper
General MC algorithms
[RaayaiArdakani 2022] - DL MC denoiser(NEW!)
[Dumont 2021] - Raman MCX
[Yan&Yao 2020] - Photon sharing
[Yuan 2018] - GPU denoising
[Yao 2018] - Photon replay
[Yao 2016] - Wide-field MMC
[Jin 2012] - Wide-field MMC for FMT
MC applications
[Hirvi 2023] - RF replay and CSF2
[Brain2Mesh 2020] - Brain2Mesh
[Yuan 2020] - PBM for lifespan
[Cassano 2019] - MCX for PBM
[Draghici 2018] - MCX for bone injury
[Verleker 2016] - Optical brain dosimetry
GPU archietecture research
[Yu 2017] - Concurrent kernels
[Nina-Paravecino 2016] - MCX performance

Citing MCX

Publications

  • Publication list

    Click on each paper to read more.
  • [Fang2009]

    Qianqian Fang* and David Boas, "Monte Carlo Simulation of Photon Migration in 3D Turbid Media Accelerated by Graphics Processing Units," Opt. Express, vol. 17, issue 22, pp. 20178-20190 (2009).

    Summary: original MCX paper

    Download

  • [Yu2018]

    Leiming Yu, Fanny Nina-Paravecino, David Kaeli, Qianqian Fang*, "Scalable and massively parallel Monte Carlo photon transport simulations for heterogeneous computing platforms," J. Biomed. Opt. 23(1), 010504 (2018).

    Summary: original MCX-CL (OpenCL) paper

    Download
  • [Yan2020]

    Shijie Yan and Qianqian Fang*, "A hybrid mesh and voxel based Monte Carlo algorithm for accurate and efficient photon transport modeling in complex bio-tissues," Biomed. Opt. Express, 11(11) pp. 6262-6270 (2020).

    Summary: SVMC - a hybrid mesh and voxel MC

    Download

  • [Yan2019]

    Shijie Yan, Anh Phong Tran, Qianqian Fang*, “A dual-grid mesh-based Monte Carlo algorithm for efficient photon transport simulations in complex 3-D media,” J. of Biomedical Optics, 24(2), 020503 (2019).

    Summary: Dual-grid MMC for faster and more accurate mesh-based simulations

    Download
  • [Fang2012]

    Qianqian Fang* and David R. Kaeli, "Accelerating mesh-based Monte Carlo method on modern CPU architectures ," Biomed. Opt. Express 3(12), 3223-3230 (2012)

    Summary: SIMD MMC

    Download
  • [Fang2011]

    Qianqian Fang, “Comment on ‘A study on tetrahedron-based inhomogeneous Monte-Carlo optical simulation’,” Biomed. Opt. Express, vol. 2, issue 5, pp. 1258-1264, 2011.

    Summary: MMC ray-tracing comparisons

    Download
  • [Fang2010]

    Qianqian Fang, "Mesh-based Monte Carlo method using fast ray-tracing in Plücker coordinates," Biomed. Opt. Express 1(1), 165-175 (2010)

    Summary: original MMC paper

    Download
  • [Yuan2018]

    Yaoshen Yuan, Leiming Yu, Zafer Doğan, Qianqian Fang*, "Graphics processing units-accelerated adaptive nonlocal means filter for denoising three-dimensional Monte Carlo photon transport simulations," J. of Biomedical Optics, 23(12), 121618 (2018).

    Summary: Denoising MC simulation using a noise-adaptive filter

    Download
  • [Yuan2021]

    Yaoshen Yuan, Shijie Yan, and Qianqian Fang*, "Light transport modeling in highly complex tissues using the implicit mesh-based Monte Carlo algorithm," Biomed. Optics Express, 12(1), 147-161, (2021)

    Summary: Implicit MMC (iMMC)

    Download
  • [Yao2018]

    Ruoyang Yao, Xavier Intes, Qianqian Fang*, "A direct approach to compute Jacobians for diffuse optical tomography using perturbation Monte Carlo-based photon 'replay'," Biomed. Optics Express 9(10), 4588-4603, (2018)

    Summary: Building Jacobians with replay in MCX/MMC

    Download
  • [Yao2016]

    Ruoyang Yao, Xavier Intes, Qianqian Fang*, "Generalized mesh-based Monte Carlo for wide-field illumination and detection via mesh retessellation," Biomed. Optics Express, 7(1), 171-184, (2016)

    Summary: Widefield MMC

    Download
  • [Fang2019]

    Qianqian Fang* and Shijie Yan, “Graphics processing unit-accelerated mesh-based Monte Carlo photon transport simulations,” J. of Biomedical Optics, 24(11), 115002 (2019).

    Summary: GPU-accelerated (OpenCL) MMC algorithm and software - MMCL

    Download
  • [Jin2012]

    Chen J, Fang Q, Intes X, “Mesh-based Monte Carlo method in time-domain widefield fluorescence molecular tomography,” J. of Biomedical Optics, 17(10), 106009 (2012).

    Summary: Axis-aligned wide-field MMC algorithm for fluorescence molecular tomography

    Download
  • [Brain2Mesh2020]

    Tran AP+, Yan S+, Fang Q*, (2020) “Improving model-based fNIRS analysis using mesh-based anatomical and light-transport models," Neurophotonics, 7(1), 015008

    Summary: We report a high-quality brain mesh generator (Brain2mesh) and quantified fNIRS modeling errors.

    Download
  • [Yuan2020]

    Yuan Y, Cassano P, Fang Q*, (2020) “Transcranial Photobiomodulation with Near-Infrared Light from Childhood to Elderliness: Simulation of Dosimetry",Neurophotonics, 7(1), 015009

    Summary: We quantified light penetration and energy deposition in t-PBM over the lifespan of human brains, ranging between 5-89 yrs old

    Download
  • [Cassano2019]

    Tran AP+, Cassano P+, Katnani H, Bleier BS, Hamblin MR, Yuan Y, Fang Q*, (2019) “Selective photobiomodulation for emotion regulation: model-based dosimetry study,” Neurophotonics 6(1) 015004, PMCID: PMC6366475

    Summary: Use MCX to systematically study transcranial or intranasal photobiomodulation (t-PBM/i-PBM) light dosage

    Download
  • [Draghici2018]

    Draghici AE, Potart D, Hollmann JL, Pera V, Fang Q, DiMarzio CA, Andrew Taylor J, Niedre MJ, Shefelbine SJ, (2018) “Near infrared spectroscopy for measuring changes in bone hemoglobin content after exercise in individuals with spinal cord injury,” J Orthop Res. 36(1), 183-191, PMCID: PMC5711624

    Summary: Use MCX to study NIR imaging of human bones in spinal cord injury

    Download
  • [Verleker2016]

    Verleker AP, Shaffer M, Fang Q, Choi, MR, Clare S. Stantz KM, (2016) “Optical dosimetry probes to validate Monte Carlo and Empirical-method based NIR dose planning in the brain”, Appl. Optics, 55(34) 9875-9888, PMCID: PMC5483856

    Summary: Optical dosimetry study using MCX for photodynamic therapy (PDT) in the brain

    Download
  • [Yu2017]

    Yu L, Gong X, Sun Y, Fang Q, Rubin N and Kaeli D, “Moka: Model-based Concurrent Kernel Analysis,” IEEE International Symposium on Workload Characterization, 2017

    Summary: A systematic approach to characterize concurrent kernels in modern GPU using benchmarks, including MCX

    Download
  • [Nina-Paravecino2016]

    Nina-Paravecino F, Yu L, Kaeli D, Fang Q*, “Portable performance for Monte Carlo simulations of photon migration in 3D turbid media for single and multiple GPUs,” GTC2016, Paper#S6635, 2016, CA

    Summary: MCX performance analysis on NVIDIA GPUs

    Download
  • [Yan&Yao2020]

    Yan S, Yao R, Intes X, and Fang Q*, "Accelerating Monte Carlo modeling of structured-light-based diffuse optical imaging via 'photon sharing'," Opt. Lett. 45, 2842-2845 (2020)

    Summary: Photon sharing for multiple patterns

    Download
  • [Dumont2021]

    Dumont, A.P., Fang, Q. and Patil, C.A., "A Computationally Efficient Monte‐Carlo Model for Biomedical Raman Spectroscopy," J. Biophotonics, (in press), (2021)

    Summary: Raman MCX

    Download
  • [Fang2022]

    Qianqian Fang, Shijie Yan, "MCX Cloud—a modern, scalable, high-performance and in-browser Monte Carlo simulation platform with cloud computing," J. Biomed. Opt. 27(8) 083008, 2022

    Summary: MCX Cloud

    Download
  • [Zhang2022]

    Yuxuang Zhang, Qianqian Fang, "BlenderPhotonics – an integrated open-source software environment for three-dimensional meshing and photon simulations in complex tissues," J. of Biomedical Optics, 27(8), 083014 (2022)

    Summary: BlenderPhotonics

    Download
  • [Yan2022]

    Shijie Yan, Steven L. Jacques, Jessica C. Ramella-Roman, Qianqian Fang, "Graphics processing unit-accelerated Monte Carlo simulation of polarized light in complex three-dimensional media," J. of Biomedical Optics, 27(8), 083015 (2022)

    Summary: Polarization-enabled MCX

    Download
  • [RaayaiArdakani2022]

    Matin Raayai Ardakani, Leiming Yu, David R. Kaeli, Qianqian Fang, "Framework for Denoising Monte Carlo Photon Transport Simulations Using Deep Learning," J Biomed Opt. 2022 May;27(8):083019. doi: 10.1117/1.JBO.27.8.083019

    Summary: DL-based MC denoising

    Download
  • [Hirvi2023]

    Hirvi P, Kuutela T, Fang Q, Hannukainen A, Hyvonen N, Nissilä I. Effects of atlas-based anatomy on modelled light transport in the neonatal head. Phys Med Biol. 2023 May 11. doi: 10.1088/1361-6560/acd48c. Epub ahead of print. PMID: 37167982.

    Summary: RF replay and neonatal brain atlas

    Download
Project maintainer:
Qianqian Fang, PhD
Developers:
Shijie Yan
Matin Raayai Ardakani
Ivy (Fan-Yu) Yen
Aiden Lewis Qianqian Fang
Former developers:
Fanny Nina-Paravecino
Leiming Yu
Yaoshen Yuan
Ruoyang Yao
Advisors:
David Kaeli, PhD
Xavier Intes, PhD
Simon Arridge, PhD
Acknowledgement
This project is funded by the NIH/NIGMS under the grant R01-GM114365.

About

The MCX Developers

  • Our team is dedicated to advancing our MCX/MMC platform towards one of the fastest, most accurate and most versatle Monte Carlo particle simulator. We have gathered a team including experts in GPU computing and optical imaging. Our project is among one of the few open-source optical imaging packages officially funded by the National Institute of Health.

    Click on each member to read more.
  • Qianqian Fang PhotoDr. Fang is currently an Associate Professor in the Dept. of Bioengineering, Northeastern University. He is the original author of MCX and MMC, and is the current maintainer of the project. He enjoys programming, and interactions with the users.
  • Fanny Nina Paravecino PhotoFanny is a PhD student in the ECE department of Northeastern University, co-mentored by Drs. Kaeli and Fang. She is our lead developer for MCX and is dedicated to making MCX faster through her insights in GPU archetecture and auto-tuning techniques.
  • Leiming Yu PhotoLeiming is a PhD student in the GPU archetecture lab of Northeastern University. He is currently working on the OpenCL version of MCX.
  • Ruoyang Yao PhotoRuoyang is a PhD student at RPI, co-mentored by Drs. Xavier Intes and Fang. Ruoyang is our lead developer for our next generation MMC software.
  • Dr. David Kaeli is a Professor in the ECE department of Northeatern University. He is our GPU guru and will guide us on every step of making MCX/MMC better and faster.
  • Dr. Xavier Intes is an Associate Professor at RPI. He is our imaging master, will help us make sure our algorithm and software are up to real world experimental tests.
  • Dr. Simon Arridge is a Professor at Univ. College London, UK. He is a well-known pioneer of optical tomography, and will help us pack more of the latest optical imaging methods into our software.
  • Shijie Yan is a PhD student in Dr. Fang's lab. He has been contributing to the development of MMC and MCX since 2018
  • Yaoshen Yuan is a PhD student in Dr. Fang's lab. He has been contributing to the development of MMC since 2019.
  • Aiden is a PhD student in Dr. Fang's lab. He is currently working on extending MMC on the GPU.
  • Ivy is a PhD student in Dr. Fang's lab. She is working on for advanced shape modeling in Monte Carlo simulations.